How to Make Postcards in Word
Among all of the potential methods small business owners have available to contact customers, postcards definitely belong on the list. Although social media and e-mail work for direct contact, postcards represent a tried and true method of contacting customers too.
 |
| © CreditDonkey |
You can use postcards to alert customers to special events, to reward loyal customers, or to provide a coupon to draw new visitors to your business. Best of all, you can cheaply create business postcards yourself, using Microsoft Word.
You don't need to hire a professional designer to do this type of work.
Preparing a Business Postcard
Spend a bit of time before starting the project thinking about the message you want to create. Think about what you want the postcard to accomplish. If you're trying to reward loyal customers, create a message that clearly shows them how much you appreciate them.
Collect any photographs or graphics you want to use with the postcard.
Finally, think about how you would like to print the postcards. You can print them on your own printer, but if you're using a full-color postcard design, printing them yourself may end up being more expensive than taking them to a print shop.
1. Find the Right Template
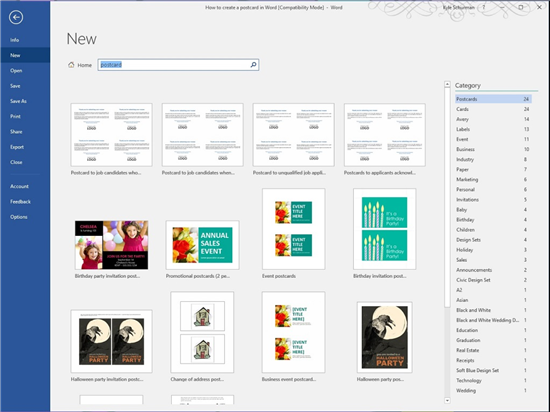 |
Inside Word, click the File menu followed by New. In the search box at the top of the window, type postcard as the search term. You'll see a series of thumbnails for postcard templates appear in the middle of the screen.
2. Select a Template
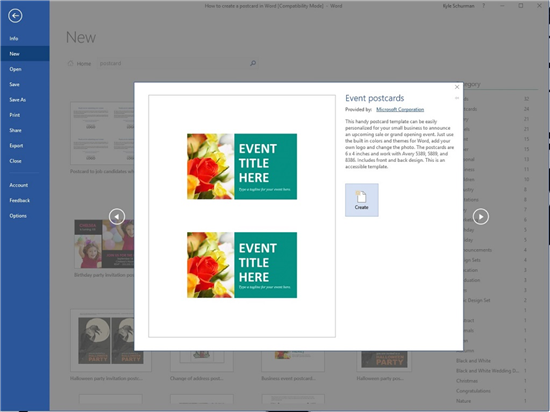 |
Look through the available template thumbnails to find one that can meet your needs. We picked the Event Postcard template.
After clicking on the thumbnail, you'll see a larger image of the template, allowing you to inspect it more clearly. If this is the template you want to use, click the Create button.
Word will download the template from the Microsoft web site, so you need an Internet connection available to use the template function.
3. Save the Postcard
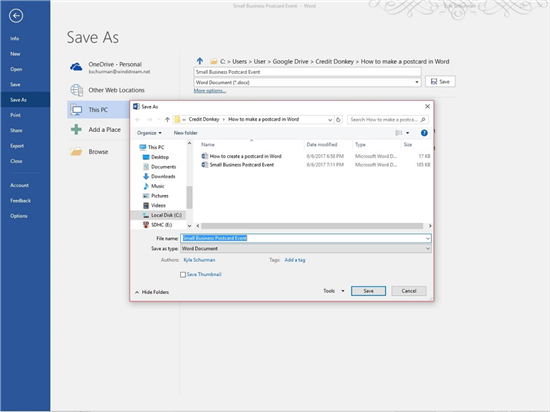 |
Before going any farther, save the document. Click the File menu and Save As. Then give it a unique name and pick a folder where you're sure you can find it again later.
One other setting we recommend using with postcard templates is the Print View. This will ensure the copy you're working with on the screen will match what it will look like when printed. Click the View menu and Print View to activate this feature. Using any other view may cause the image to appear stretched.
4. Work on the Title
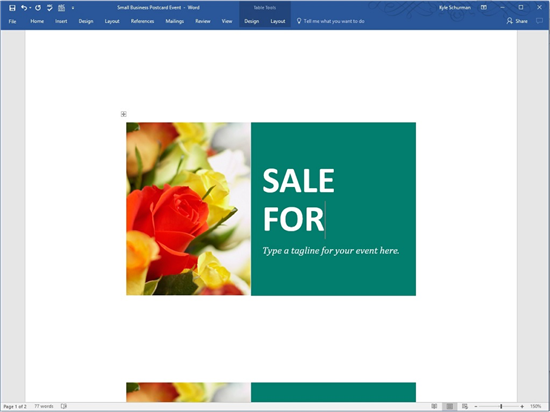 |
With the template we selected, we see two copies of the postcard template in the Word window. This just indicates that you can print two postcards per standard 8.5-inch by 11-inch piece of paper.
To edit the title, triple left-click on the title on the template. Word will fully highlight the entire title, using a gray background. Just begin typing to edit the title.
We changed the title to "Customer Loyalty Reward Sale," something that can grab the attention of the recipient.
5. Adjust the Text Size
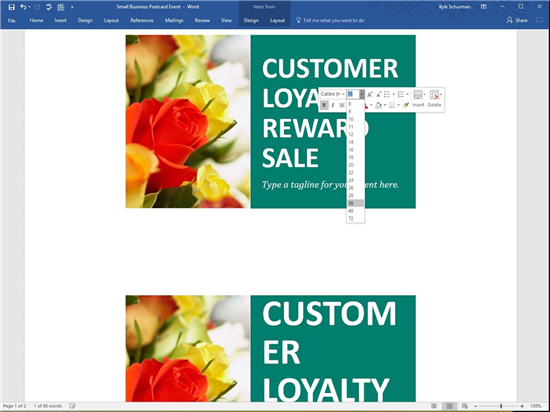 |
When we created our new title, it didn't fit well at the default text size. The word "Customer" bled over onto two lines, which is a bad look. (You can see this in the lower copy of the postcard in our screen shot.)
Rather than re-wording the title, we decided to shrink the size of the text a little bit, just to ensure all words would fit on one line. We once again triple left-clicked on the title text block, highlighting it.
We then right-clicked on the highlighted text, causing a popup menu to appear.
Near the top of the popup menu, you'll see a text size menu button. Click on it and select the new text size. You can do this multiple times to test different text sizes. We settled on 36-point text.
6. Edit Second Line of Text
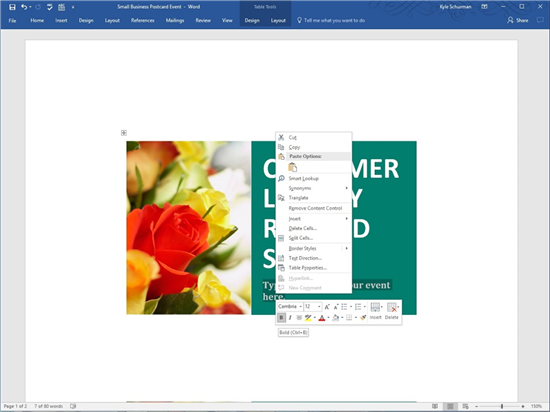 |
You can change quite a few aspects of the text on the template. On the lower line of text, we decided to change the font and italic emphasis.
Highlight the line of text you want to edit and right-click on it. In the popup menu, you can change the italic emphasis to bold by clicking on the I button to turn italics off and by then clicking on the B button to turn on bold emphasis. Make any other changes you'd like too.
Then, with the text block highlighted, go ahead and type the phrase you want for that area.
7. Edit the Photograph
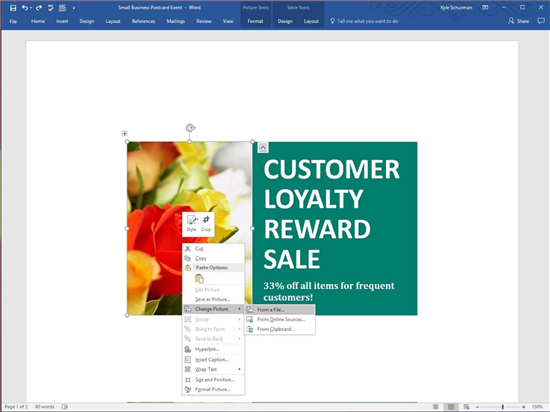 |
Our sample postcard is for an ice cream store, not for a flower store. So we're replacing the photo of flowers in the postcard template with our store's logo.
Left-click on the photo to highlight it. You should see a border with dots appear around it. Then right-click on the photo and left click on Change Picture, followed by From a File. Select the file you want to use as the photo and click Insert. Once the photo or logo is in place, you can stretch or shrink it a little bit by clicking and dragging the dots on the borders.
When changing a photograph on this postcard template, you'll notice that the photograph is vertically aligned. This means you'll want a vertically-aligned logo or photo to replace the template's photograph. For the best results, pick a photo or logo that is similar in size and aspect ratio to the template's default photo.
8. Edit the Background Color
 |
Blue is the base color for our "Dream Ice Cream" business for this postcard, so we want to change the green background on the right two-thirds of the postcard (where the text is) to blue. This process is a little tricky, so it may take you a couple of tries.
Left-click in the blank space to the right of the postcard and continue to hold down the left mouse button. Slowly drag the cursor to the left until you're over the postcard. You'll now see a gray highlight around most of the green box area, with a slight overhang on the right side.
Now right-click anywhere on the background where there is no text. In the top part of the popup menu, look for the "paint can" icon (labeled Shading when you hover your cursor over it). Left-click on the arrowhead to the right of the "paint can" icon, and you then can pick a new background color by clicking on a color square. If none of the preview colors are right, click on More Colors and you'll have the ability to select any color.
As a nice feature, when you hover your cursor over the color squares, the background will temporarily change, so you can see how that color looks.
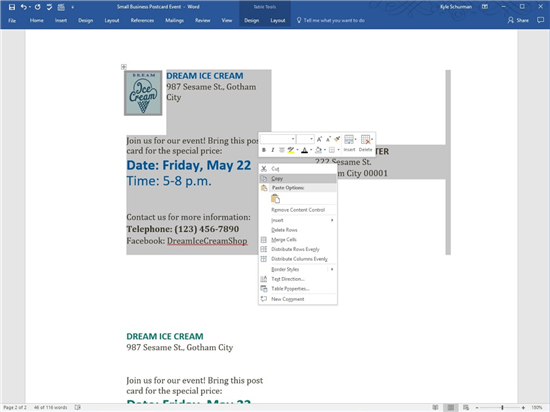
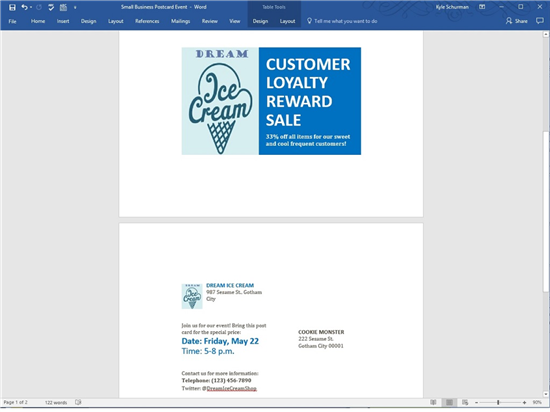
9. Editing the Back of the Postcard
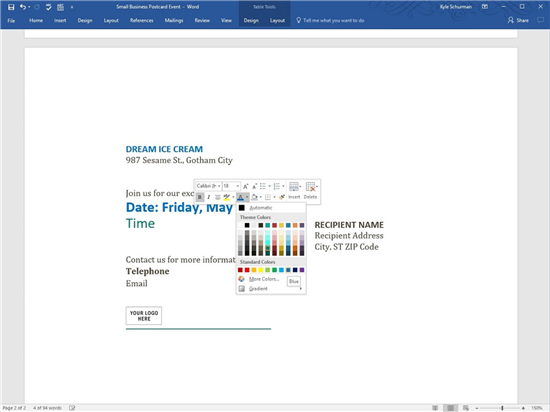 |
If you scroll down the Word postcard template, you'll see a second page. This represents the back of the postcard. Again, there are two identical copies at the top and bottom of the page, matching what was on the previous page.
Most of the text on the back is easy to understand. You can add your company name, location, date and time of the event, and contact information along the left side of the postcard template. To edit the text, highlight it by double-clicking on it and then type the new information.
To change the size, color, or font for any text on the back, just highlight it by double-clicking on it. Then right-click on the highlighted text and make changes by left-clicking in the popup menu.
Keep in mind that if you use color on the front and back of the postcard, the printing job will cost a lot more, whether you do it yourself or send the job to a printer. To save some money, consider leaving the back of the card in black text only. To maintain black text on the black, delete the "Your Logo Here" box by left-clicking on it to highlight it and pressing the Delete key.
If you want to remove the line at the bottom of the information area, left-click anywhere on the postcard. Then left-click on the "plus" icon in the tiny box in the upper left corner of the postcard. In the popup menu, find the Borders menu (middle of the lower row of icons). Left-click on the arrowhead for Borders and left-click on No Border.
10. Creating the Addresses
 |
You have three options for creating addresses yourself. (This is not an easy process and will take a bit of time.)
The best way to create addresses is to print peel-and-stick labels with each name and address on them and then stick them onto the postcards after they're printed. If you have your customers listed in a spreadsheet or database, you can use this information to print the labels too. Just delete the text in the Recipient Name area if you're going to use stickers.
After typing two names onto each postcard template on this page, print the two postcards (as described below), and then repeat the process of entering new names.
Finally, you can address the postcards by hand after printing them, perhaps adding a personal note, if appropriate. Again, to do this, delete the text in the Recipient Name area before printing.
If you plan to send postcards like this on a regular basis, we suggest creating a database of your customer list and printing peel-and-stick address labels each time.
11. Mirroring the Postcards
 |
Once you've finished your editing on the postcards, highlight and copy the upper postcard on both pages. Then paste the edited copy over the lower postcard on both pages. To highlight the area, click on the lower right portion of the postcard and drag your cursor to the left and upward.
If you're having trouble making this work properly, remember that the CTRL-Z keystroke combination is a shortcut for Undo.
If this copy and paste process just isn't working for you, you always can make editing changes to the lower postcard to match the upper postcard.
12. Print Time!
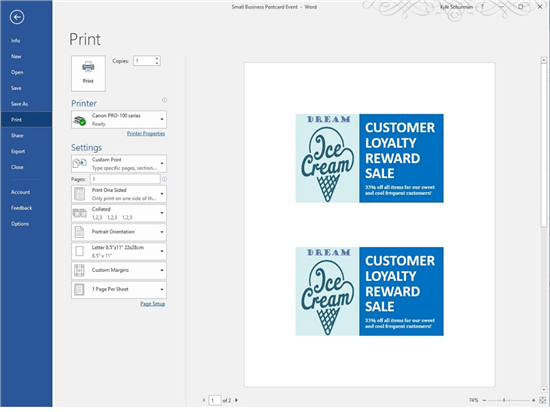 |
When you're ready to print the postcards, you'll have to decide whether to print them yourself or send them to a professional printer.
If printing yourself, click the File menu and Print. In the Print window, select your printer. Scroll down and change the Print One Sided box to Manually Print on Both Sides, and Word will prompt you when to reinsert the paper.
Because it's important that the front and back of each postcard line up exactly, we suggest testing your printer's two-sided print option first. Use plain paper for the test. In the Copies box, enter "1." Then click the Print button.
When prompted by Word, reinsert the plain paper back into the printer (and write down exactly how you inserted it so you don't forget). Most printers will perform two-sided printing by having you insert the previously printed page facing upward and the top of the page toward the interior of the printer.
Make sure one copy is selected and click Print again. You should end up with the postcard front and back lined up properly on opposite sides of the paper. If not, try again, reinserting the paper a different way.
Once you have the test page figured out, insert the card stock into the paper tray. Open the Print window and enter the number of pages you want to print in the Copies box (keeping in mind that each page contains two postcards). Make sure Manually Print on Both Sides is selected. Then click the Print button.
When prompted, reinsert the cardstock into the printer, using the technique you figured out during the test phase. Then enter the same number of pages you want to print in the Copies box.
If this seems like too much to handle, you always can take the postcards to a professional printer. Depending on how much you pay for ink for your printer, it may be cheaper to have them printed elsewhere.
Final Steps
 |
Once the printing is done, cut the postcards apart, trimming the edges of the paper if necessary to achieve the correct size. Take care as you're cutting on one side that you're not ruining the text on the other side. Add your address labels and stamps, and you're ready to send them out!
Write to Kyle Schurman at feedback@creditdonkey.com. Follow us on Twitter and Facebook for our latest posts.
Read Next: